Simple seismograph
 A seismograph is a device used for recording earth tremors. Basically, it is a heavily weighted horizontal rod (pendulum) suspended from a pole. This rod is free to swing from side to side if the earth shakes. One end of the rod rests against the pole, while the other holds a pen or stylus. This stylus marks a slowly moving roll of paper. If there is no shaking, the passing paper is marked with a straight line. If there is a tremor, the paper is marked with a squiggly line.
The waves that reach the seismograph are, in order: the P or primary waves, which are caused but compression of rock, and which travel straight through the earth; S or secondary waves, which are shear waves caused by rock shaken from side to side; and L waves, which are surface waves caused by rolling motions of the surface. L waves, which travel along the surface, are the last to arrive. They are also the most destructive. Since these waves travel at different speeds, seismologists can pinpoint the origin of an earthquake (epicenter) by comparing their arrival times.
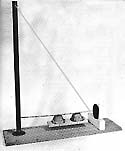
A simple seismograph, as shown here, is easy to build and will record local vibrations such as passing trucks or people walking past it. Later in the article are modifications to this design that will make an instrument sensitive enough to record distant earthquakes. The text and photos for this model are from Science Equipment, by William Moore, 1962. You will need:
- 1 piece steel pipe, threaded at least at one end, 1 inch by 3 feet
(25 mm by 100 cm)
- 1 steel floor flange 3 1/2 inches (88mm) in diameter (should fit the pipe)
- 1 steel rod 1/4 inch by 24 inches (6mm by 60cm)
- 1 piece steel wire app. 3 feet (100 cm) long
- 1 wind up alarm clock
- 1 piece of wood, 3/4 inches by 1 foot by 3 feet
(20mm by 305mm by 915mm)
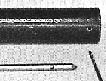 "Begin by screwing the flanged plate to one end of the large board. Next drill holes through the top end of the pipe for the wire. Also drill a hole for the wire at about one inch (25mm) from the end of the steel rod. The steel rod must be pointed at both ends, so place it in a vise and file on alternate sides of the rod. After this is done, drill a small dimple about six inches (150mm) above the threaded end of the pipe in which one pointed end of the steel rod may rest Attach the wire to the end of the pipe and the end of the rod next, and after screwing the pipe into position tightly, place the pointed end of the rod in the dimple. Now wire some heavy weights to the steel rod. These may be lead blocks as shown here, or bricks, or even sash weights.
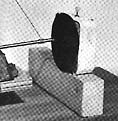 The recording device should be prepared next. This is done by removing the glass or plastic cover on the clock face and cementing a white cardboard disc to the (hour) hand of the clock. Use a candle or small lamp to cover the disc with soot. Now mount the clock on a piece of scrap wood, so that the point of the steel rod barely touches the disc at the nine o'clock position on the dial. Experiment with the position of the clock until the correct location is found before fastening it permanently. For greater accuracy, be sure to clamp the baseboard to the bench or table."
Modifications
Once the basic design is understood, it is possible to design and construct a much more sensitive seismograph. There is a great deal of leeway for experimentation. A few tips are:
- The base should be solid and positioned on the ground. A large paint drum half filled with concrete works well; a concrete umbrella stand works even better.
- The upright support should be very solid. Metal pipe or angle iron works well as long as it can stand upright and remain very steady. The post should be anchored firmly in the concrete base. Three or four feet high (90-125 cm) should be sufficient.
- Any rigid length of metal can be substituted for the steel rod arm (pendulum) in the above plan, as long as it rigid enough not to bend when suspended from the upright. A thin strip of metal can be folded to make a strong, rigid channel. It should be about 3/4 long as the upright is tall. The end of the rod that contacts the upright comes to a sharp point. Ideally, the point of contact on the upright should be a bearing, which can be adjusted in or out for fine-tuning. This point of attachment should be about 6 inches (150mm) up from the base (this will depend on how high your recording apparatus is positioned).
- The wire supporting the arm/pendulum attaches to the top of the upright. It is best to make this attachment adjustable with an arrangement of angle irons, nuts, and washers so that the wire and pendulum can be easily raised, lowered, and moved from side to side in small increments.
- The wire attaches to the arm/pendulum at about six inches from the upright. The weight should lie near this point of attachment. A metal food can filled with plaster is convenient to work with; the arm/pendulum can pass through it, and the wire can attach to the can itself.
- The other end of the arm holds the recording stylus. What is used here depends on the material being recorded on. A needle works well for smoked metal, aluminum foil, or glass. If paper is the recording material of choice, pens must be chosen that will write with light pressure, but will not readily dry out. The type of pens used in plotters are one option. Whatever is used, it must be remembered that it will be striking the recording surface very lightly.
- There is more room for improvisation with the recorder than with the rest of the seismograph. The clock dial method above works well; there is an article on a cylinder type phonograph in these pages that may give the adventurous designer an idea. If you do it this way, though, remember that the drum must rotate easily if it is to be turned by the minute hand post of an electric or wind-up clock. The drum should rotate away from the stylus. It is also possible to record on a roll of adding machine paper using two rotating drums. The recorder should be firmly set so that it does not get knocked around easily.
Once I have finished my own seismograph, I will add the plans to this page.
© Brian Carusella and Bizarre Labs. All rights reserved.
Quotes and images not my own remain in the copyright of the originator or else in the public domain.