


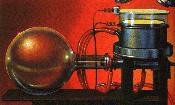
 A cloud chamber is a device that makes visible the paths of particles emitted as a result of radioactive decay. Pictured here is Wilson expansion type chamber. A very simplified version can easily be constructed. The trick is in finding a relatively safe radioactive sample. Some (not all) old luminous watch and clock hands will work, as will some luminous paints. Trial and error will determine which ones work. Surprisingly, some older glassware (true cobalt blue) and ceramics glazes are slightly radioactive. It is also rumored that a popular brand of mantles for gas camper's lanterns are slightly radioactive (a Thorium isotope). And a reader points out that some smoke detectors contain a small sample of radioactive americium (strip a broken one, not the good one, okay kids?) Americium is actually fairly dangerous to handle, so I don't recommend doing this unless you really know how to handle radioactive materials safely. At the very least you should wear rubber gloves when doing this. Remember that radioactive samples should be handled carefully, and prolonged exposure to even low levels of radiation can be dangerous.
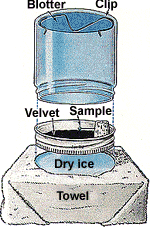 Cut the blotter paper or sponge, whichever you are using, in a circle to just fit the bottom of the jar. Use the wire to form a clip to hold the blotter in place inside the bottom of the jar. If you have trouble keeping the blotter in place with the wire, attach it with a bit of epoxy. Cut a piece of black cloth to just fit inside the jar lid. Place the radioactive source in the jar lid. Pour some alcohol in the jar. Swirl it around, soaking the blotter or sponge in the bottom.
 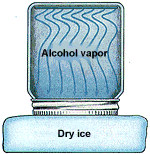 Pour out the excess alcohol. Screw the upside down jar onto the lid, leaving the radioactive sample in place on the lid. Let sit for 10 or 15 minutes. Place the jar, lid down, onto the dry ice in the pan. Be very careful not to touch dry ice with your bare hands! The alcohol should cool in 5 minutes or so. To create a good saturation zone for the alcohol, warm the top of the chamber by placing your hand on it (opposite the dry ice). Turn off the room lights, and shine a flashlight through the side. Once the jar is really cold, the alcohol will vaporize, and trails will be visible where the sub atomic particles cause it to condense. (Actually, the electrically charged particles ionize air molecules in their path, and the alcohol condenses around these ions.) Safe sources of radioactive material are available from scientific supply houses.

When a subatomic particle enters the chamber, they collide with air or alcohol vapor molecules, producing free ions. Vapor in the chamber condenses around these free ions, forming droplets. The droplets are what form the trail. Different types of particles will leave different trails. Alpha particles, which are relatively heavy, will produce straight dense trails (below, left). Beta particles are light and leave wispy, irregular trails (below, center). When there is no radiation source, cosmic rays may enter the chamber, producing thin misty trails (below, right).
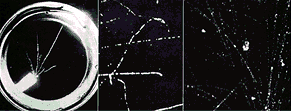
Some other phenomena you may notice are low-energy particles (often low energy cosmic rays) which produce "curly" or jagged paths as they bounce off of other particles; straight paths suddenly shooting of into another direction usually caused by particle decay; and three paths intersecting, which is often the result of a cosmic ray striking another particle, sending both careening off in different directions.

With slight changes in design, you can construct a cloud chamber sensitive enough to detect cosmic rays, which are tiny energy particles from explosions occurring in outer space. The plan is almost exactly the same as the cloud chamber, except for three things. First, there is no radioactive sample placed in the lid. Second, the cloth in the lid is soaked with alcohol. Third, the jar is wrapped with a cylinder of black paper that can be slipped on and off (construction paper works fine). There will be two rectangular holes cut into the paper, at 90-degree angles to each other. The first hole is an inch (25 mm) or so above the bottom of the cylinder, and the bottom of the second one is even with the top of the first. Prepare the jar the same as the cloud chamber above, saturating the blotter in the bottom of the jar with alcohol, screwing on the lid, and letting it sit for 15 minutes. Slip on the paper cylinder, and place lid side down on the dry ice. Once it has had time to cool, shine a source of bright light (such as a slide projector) through the lower hole. You should be able to see trails left by cosmic rays through the upper hole. If you want to test their charge, place a magnet near the cloud chamber and note the deflection.
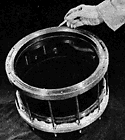 Pictured to the left is the original Wilson cloud chamber, designed by C. T. R. Wilson in 1911. In it air is saturated with water vapor. The sealed chamber expands, cooling the air and causing the water vapor to condense.
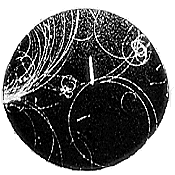 Since there is no dust in the chamber, the water vapor readily condenses on any ions that may be present. Ions are left in the wakes of ionizing particles, such as alpha, gamma, and cosmic ray particles. The top of the chamber, visible in the picture, is a glass plate for viewing the trails. Opposite this is a piston used for expanding and contracting the volume of the chamber. The picture to the right is of trails produced by charged particles. The trails are curved because the charged particles are deflected by magnetic fields around the chamber.
I also have vintage (1960) construction plans for an expansion cloud chamber, as well as another continuous type. Due to the high volume of requests, I have included these here.
Chambers can also be constructed from clear plastic containers with airtight snap on lids. Square or rectangular containers actually work better because they provide a clearer view. Find a container that provides a relatively undistorted view of the bottom.
Since the plastic bottom will somewhat insulate the inside of the chamber from the dry ice, you will need to cut a hole in the bottom, leaving app. an inch lip (25mm) at the edges. Cut out a thin sheet of metal the same size as the bottom and attach it to the bottom lip from the outside with silicone gel. It helps the silicone to stay put if you first drill a few holes around the lip. Use enough silicone to make a good airtight seal. Weight it and allow it to dry.
Paint the top and sides black, leaving an unpainted area in the rear for illumination, and a larger unpainted area in the front for viewing. Try not to get any paint inside the chamber. Cement a piece of black felt to the inside of the lid, and place (do not cement) a second piece on the floor (metal plate). Use it the same way you would use the cloud chamber or cosmic ray detector above, saturating the felt with alcohol, placing the chamber on a piece of dry ice, waiting 15 minutes, and illuminating from behind.
If things aren't working quite right (no tracks, too much mist, too little mist, etc.) check to make sure that your chamber is air tight; that it has sat for at least 15 minutes; and that your source of illumination is adequate. If it never works, try using a different container (taller, shorter) for the container.
- suggested by Mark Fowler

This article was printed from the Bizarre Labs website at bizarrelabs.com