


 Motion pictures developed from many different traditions, including theatre and magic shows, but also from the Victorian fascination with the phenomenon of persistence of vision. The human brain retains an image for a fraction of a second longer than the eye actually sees it. That is why the world doesn't suddenly go black every time you blink. When you watch a movie, what you are actually seeing are individual still frames of film projected at 24 frames per second. Each of these frames is separated by darkness, so you are sitting in a dark theatre about half of the time. The images are discontinuous; that is, all of the action that happened between the frames is not represented. Because of persistence of vision, what you perceive is one image blending into the next, giving the illusion of movement and continuity. The dark spaces are "ignored" by the brain.
Persistence of vision has been known about for a long time, but an article written by Roget (of Thesaurus fame) in the early 19 th century spawned popular interest. After this many novelties and popular entertainments were invented based on the principle. (Most with classically based names - the Victorians felt using a Latin or Greek name gave credibility to their inventions. This tradition of naming cinematic equipment and processes lasted much longer; hence Technicolor, Panavision, CinemaScope, and even television.) What follows is a brief description of the principal designs, and notes on constructing models of them. There were many more devices invented than those listed here, which were the major, most influential designs.
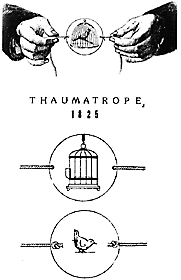 Dr. John Ayrton Paris probably invented the Thaumatrope in 1825. It may also have been invented by Sir John Herschel, Charles Babbage, or any of a handful of others, but Paris is usually considered the originator. It was the first of the toys based on persistence of vision, and was the simplest in design. On one side of a round board was drawn a bird; on the other was a cage. When the board was held at the sides by two strings and spun, both images merged and the bird appeared to be in the cage.
This is the simplest of all of these devises to build. Cut out a round disc from a piece of fairly thick white paper board (illustration board). Size is not critical; anywhere from 2 to 10 inches (50-250mm) or so will work well. Punch two holes at opposite sides, placing them as nearly exactly opposite as possible. Secure a loop of string through each pair of holes. The loops should be short enough so that you can easily hold the device while it is stretched out. If you want to replicate the original image, draw a bird on one side of the disc, and a cage on the other. The bird should be centered so that it will fit in the cage when the disc is flipped. Hold the string ends one in each hand and "wind" the Thaumatrope by flipping the disc, which will cause the string loops to twist. Once the loops are good and twisted, gently pull them, and the disc should spin, putting the bird in the cage.
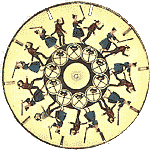 Joseph Antoine Ferdinand Plateau invented the Phenakistiscope (a.k.a. Fantoscope) in 1832. It is basically a disc fixed at its center so that it can spin freely. Around the edges are regularly spaced slits, and in conjunction with each slit is an image drawn in sequential stages of movement. Like all of the circular animation devices that followed, the animation was drawn in a cycle of sequential movement; there was no beginning or end, but a continuous kinetic flow. The person using the device would hold it between them and a mirror, with the images facing the mirror. When the disc was spun, the images were viewed, reflected by the mirror, through the passing slits. The spaces between the slits let the eye and brain "soak in" the image so that persistence of vision could create the illusion of movement. And, because the slit was narrow, each individual image was seen only in one position and was not blurred.
Modern motion pictures rely on the same principles. The film doesn't simply zip through the projector. Each frame comes to a dead stop, light is allowed to pass through the film, the image is projected, the light is blocked, the film moves to the next frame, which stops dead, and the whole process starts again, 24 times a second. This all gets even more complicated when it is considered that through at least part of its path film must run continuously, without stopping jerkily, in order for the sound track to be read.
 Plateau was the first to recognize that the eye and brain required a resting time between images, and also realized that there existed an optimal number of frames per second to produce a moving image (he determined it was 16, which was the standard until the sound era).
The Phenakistiscope was developed separately at the same time by the German inventor Stampfer; he dubbed it the Stroboscope. Many other versions and refinements followed, including a model designed by Stampfer with two discs which moved together, one with the images, and the other with the slits. In 1853 Baron Franz von Uchatius invented a projecting Phenakistiscope using sequentially placed magic lantern slides. This produced the earliest projected moving images.
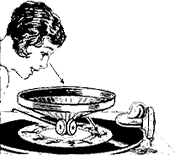
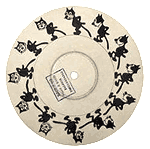
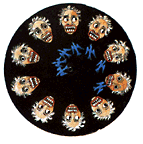
Variations on the basic idea survived well into the 20th century. Above is pictured a Kinephone, or gramophone cinema, from the 1920's. This was meant to be viewed using a 78 r.p.m. phonograph turntable . The image on this particular disk is of Felix the Cat, a popular cartoon character of the time.
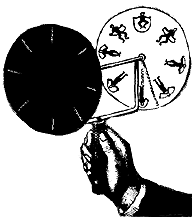 Cut a disc from illustration or mat board. The disc should be about 10 inches (250mm) in diameter. Divide the disc into 12 equal parts, and cut slots in the edge of the disc at each division point. The slots should extend about one inch toward the center, and should be from 1/8 to 1/4 inch (3-6mm) wide. The animated sequence appears between the slits and slightly beneath them. It may be helpful to lightly draw a circle to line up the base of your animations. Remember that since this is a circular sequence, the motion from one image should blend into another all the way around. Once you are satisfied with your drawings, attach the wheel loosely to a wooden stick with a pushpin. It should be as centered as possible and the drawings should face away from the stick. Hold it up in front of a mirror, spin the disc, and look through the slits. A more durable device can be made with wood or masonite mounted on a wooden axle.
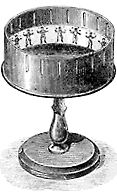
The zoetrope, or Wheel of Life, takes the Phenakistiscope's principle of using slits to view the image and folds it into a rotating drum. Invented in 1834 by William George Horner, the image was drawn on a removable strip of paper, so the animations were changeable. The slits were equally spaced around the drum, and the images were spaced along with them. The viewer spun the drum and watched the animation through the slits. This was perhaps the most popular and longest lasting of all of these toys. Horner originally named it the Daedalum, or Wheel of the Devil, but changed it before marketing.

 Once the basic design of the zoetrope is understood, one can be constructed as simple or complex as you want. The wall of the drum has evenly spaced slits (usually from 12 to 20) along the top edge. Each of these is 1/8 to 1/4 inch (3-6 mm) wide. Their length from top to bottom depends on the size of the device, but they usually extend about halfway down. The walls are mounted on a base of wood, illustration board, cardboard or whatever is easily worked and rigid enough. zoetropes were originally built in a wide range of sizes, but anything between about 8 to 12 inches (20-30 cm) in diameter is a good range for a first project. The trick is getting it to rotate smoothly. A light poster board model can be made to balance on a pin, but a heavier model will need a sturdier rotation point. A phonograph turntable works well. Whatever is used, the axis of rotation should be as dead center as possible. The images are drawn onto a strip of paper that will fit around the inside wall of the zoetrope without covering the slits. They are spaced the same as the slits, and each image should lead into the next, including the first into the last.
To get you started, a simple zoetrope project has been added that you can print and assemble.
Onward to Animation Toys, page 2...

This article was printed from the Bizarre Labs website at bizarrelabs.com