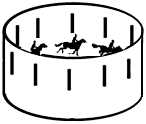


 First you will need to print strip A, strip B, and strip C. You can save the GIF files and print them from a graphics or word processing file on your computer, or you can print them directly from the browser as long as they print full size. The two longer strips should be 9 inches long.
 Once the strips are printed, cut them from the paper along the outer edges using a craft knife. Make sure you cut just behind the black line on the right end of the strips; this way it won't interfere with the animation. Cut out the black rectangles above each horse.
Glue or paste tab B on strip B to the back right end of strip A. The line that separates tab B from strip B should be just covered by strip A, here again so it will not interfere with the animation. Keep the strips as straight as possible.

Repeat with strips B and C.
Measure the total length of the strips excluding tab A. Write this measurement down somewhere.
Glue tab A to the back of strip C to form a loop. The horses should be on the inside of the loop.
The size of the bottom will depend on the length of the strips. If you printed from your browser, the length of the strips should be about 16.5 inches (42 cm). You will need a bottom that is a circle with a diameter of about 5.25 inches (13.4 cm) . If you have printed from a graphics program, the strips should be about 22 inches (55.9 cm), requiring a bottom with a diameter of 7 inches (17.8 cm). If your strips are a different length, just divide this length by pi (app. 3.14) since the diameter of a circle is equal to its circumference divided by pi. Set a drawing compass to the correct diameter and draw a circle on a piece of poster board or light card stock. Cut the bottom from the cardboard. If you are using a phonograph turntable to spin your zoetrope, cut a small hole in the center to accommodate the turntable's spindle. The hole should be as centered as you can make it.
Glue the assembled strips to the bottom using the saw tooth tabs.
 Place the assembled zoetrope on to the turntable and start it spinning. Shine a fairly bright light at the image opposite the edge from where you are viewing. Look through the outer slits at the image opposite you and you should see the horse running.
A phonograph turntable works best, but if you don't have one you can simply improvise a way to get your zoetrope to spin. The simplest way is to push a thumbtack through the center point in the bottom, and then push the thumbtack partway into a small piece of wood or rubber eraser. You will have to get the thumbtack as centered as possible in the bottom so that it will balance.
Now that you know the basic design of the zoetrope, you can make a more elaborate model with your own removable animations (see the main animation toys page). When laying out your drawings, they need to run from right to left, since the zoetrope will be spinning clockwise. Also, if you change the number of individual pictures in an animation, the number of slits needs to be the same. The slits should align with the center of the opposite image they face.
This article was printed from the Bizarre Labs website at bizarrelabs.com