


 In order for a total solar eclipse to occur, the moon must pass directly between the sun and earth so that its shadow is cast onto the earth. Since the moon orbits the earth every 28 days, it is between the sun and the earth every 28 days; however, most of the time the shadow of the moon misses the earth. Full solar eclipses are rare; only 2-5 occur anywhere on the earth in a year, and because the moon's shadow (umbra) is so small, only observers in an app. 100 mile / 160 km wide path will view the total eclipse. If you are ever in the correct place to see a full solar eclipse, count yourself lucky: it may be centuries before that area sees another.
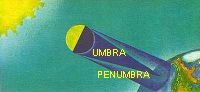 Of course a much larger area of the earth will be able to observe an eclipse when it happens, just not the totality. If you are within the penumbra (the larger, partial shadow of the moon), you will be able to observe the moon partially cover the sun. The further you are from the umbra (perfect center shadow), the less of the moon will pass in front of the sun.
Partial solar eclipse - This occurs when the disk of the moon only partially covers the disk of the sun. The sun appears as a crescent. This is also what observers see during a total eclipse when they are outside of the umbra cast by the moon but within the penumbra.
Annular solar eclipse - This happens when the apparent size of the disk of the moon is smaller than the apparent size of the disk of the sun. The light of the sun is not completely blocked.
Total solar eclipse - This occurs when the disk of the moon covers the disk of the sun completely. This is the rarest type. Totality lasts at the most only 7 minutes, and is visible only within a path that is usually app 100 miles/160 km.
Annular-total solar eclipse - Occurs when the apparent size of the sun and moon are the same. Totality will last for less than a second.
Sunspots are relatively cool (around 3,500°C / 6,300°F as compared to around 5,500°C/10,000°F for the surrounding surface), irregularly shaped areas on the surface of the sun. They are a result of part of the sun's magnetic field being "twisted" and poking up through the photosphere, one of the outer layers of the sun. The amount of sunspots is related to the "solar cycle", a roughly 11 year cycle of solar activity. There are more sunspots and solar flares at the peak of this cycle, the "solar maximum". The most recent solar maximum was in 2000.
WARNING! Never, ever, look directly into the sun, or through any pinhole optical device, or through optical filters, sunglasses, smoked glass, etc. during an eclipse or otherwise. You will cause permanent damage to your eyes or blindness. If you look directly at the sun, its energy is focused by the lenses of your eyes onto the retina at the back of your eyes. The retina will then actually burn and be permanently damaged. You won't even know this is happening because you don't have any pain receptors in that area. Sounds scary? It should! This happens to hundreds of people every time there is an eclipse. Don't be one of them! Even though you can't safely observe the eclipse directly, you can easily project an image of the sun to watch. There are three basic setups for projecting an image of the sun for observation: pinhole, glass optical, and reflection.
 The simplest version of the pinhole sun projector requires only two pieces of cardboard, a small piece of aluminum foil, and a needle. One of the pieces of cardboard needs to be white in order to serve as a projection screen. A small square is cut in the center of the other cardboard, and a piece of aluminum foil is taped over it. A pinhole is carefully made in the foil.
Hold the cardboard with the pinhole pointing towards the sun. Adjust it until you can make a good round image on the screen. The farther you hold the pinhole from the screen, the larger (and fainter) the image. Ideally, the pinhole should be app. 3 feet (1m) from the screen. To form the best image, the screen should be propped up so that it is at a 90 degree angle to the sun; the pinhole should be at the same 90 degree angle. This will provide the least amount of distortion of the image.
 You can easily refine this simple setup by constructing a pinhole projector. As you can see from the diagram, it is basically a long closed box or tube. You can paint the inside of it flat black to eliminate reflections, but this isn't essential. At one end, a piece of white paper or cardboard is glued to the inside. This will serve as a screen. On the opposite end, a small hole is cut in the center. A piece of aluminum foil is taped tightly and securely over this hole. Make certain there are no light leaks. A pinhole is then carefully punched in the foil, as close to the center as you can make it. On one side near the screen end, opposite the pinhole, another hole is cut, just large enough to view the image on the screen.
The length of the box or tube used affects the image size and clarity. A longer tube will produce a larger but fainter image, a shorter one will produce an image that is smaller but brighter. The image produced will be roughly 1/100 the length of the box in diameter. A box around three feet or a meter long is a good compromise.
Also, the size of the pinhole has a great affect on image quality. A smaller hole will make a sharper but dimmer image; a larger hole will make a brighter but fuzzier image. If you want to make a really long projector, you can make larger "pinholes" to accommodate them. Just make sure that any holes large enough to cut (rather than punch with a pin) are clean and as perfectly round as possible. You will need to go through a lot of trial and error when building a really large projector, but generally the distance from the screen to the hole should be app. 200 to 500 times the diameter of the hole.
To use, point the pinhole end of the box directly at the sun. To help align it properly, watch the shadow on the ground cast by the box. It should be aligned so that the box casts the smallest shadow possible. Look through the side viewing hole at the screen and adjust the position of the box until you can see the projected image of the sun. You can fix the projector in place so that it does not have to be hand held, but you will need to move it periodically to compensate for the sun's apparent movement across the sky.
You can use a pair of binoculars or a monocular to project a bright, clear image of the sun, clear enough in fact to see sunspots. A few warnings should be given first. Of course, never look through the binoculars at the sun. Also, filter the collecting lens of the binoculars to block some of the UV. Filters specifically for this purpose can usually be purchased wherever telescopes and telescope accessories are sold. If you do not use a filter, you will likely overheat the binoculars which will damage the lenses or their mounts. Don't put anything flammable directly behind the eyepiece within and inch or so (including your hands!) because the energy projected can be hot enough to burn. Finally, even if precautions are taken, sometimes the heat that builds up inside the binoculars can damage the lenses and their mountings, so don't use an expensive pair.
You will need a piece of cardboard as a shield. Cut two holes near the center to accommodate the collecting (rear) lenses of the binoculars (one hole for a monocular). Place this shield over the collecting lenses. Tape around the edges of the holes with opaque tape to cover any gaps between the shield and the lenses. You will need to mount the binoculars to a tripod or some other secure mount so it can be fixed in place and adjusted as needed. Cap one of the collecting lenses.
Set a piece of white cardboard on the ground to serve as a screen. The shadow of the binoculars/screen should fall on this screen. Aim the collecting lenses toward the sun and adjust until an image is projected onto the screen. For minimum distortion of the image, angle the screen so that it is perpendicular to the binoculars. By focusing the image, you may be able to see sunspots. Every minute or so, cover the lenses or alternate which lens is covered. Keeping them uncovered for too long will damage the optics. Make sure no one tries to look through the binoculars!

This article was printed from the Bizarre Labs website at bizarrelabs.com
